






- Navigation -
 Current Location:
NEWS DETAILS
NEWS INFORMATION
Welding Table Maintenance: Spatter Protection, Hole Care and Accuracy Retention
AUTHOR:Bozhong Tool DATE:2026-10-29 10:58:53 HITS:186
Modular welding tables rarely fail suddenly. They drift: a clamp that no longer seats cleanly, a stop that sits a fraction high, a layout that takes an extra ten minutes because the welder is fighting the surface. Almost all of that drift is maintenance, and almost all of it is preventable with a routine that takes minutes a day.
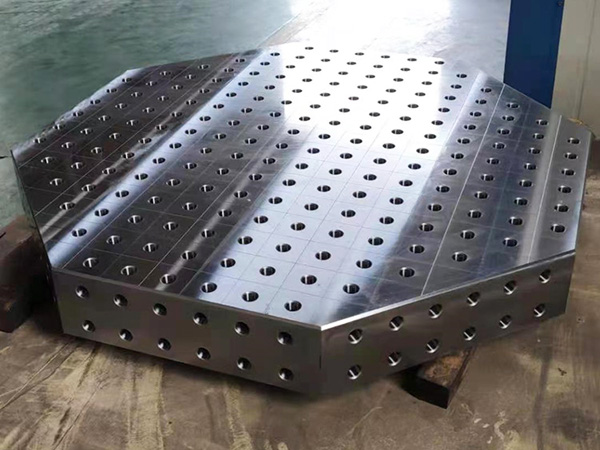
This article sets out a welding table maintenance programme organised by interval, explains why hole care matters more than surface appearance, and lists the habits that quietly destroy an otherwise serviceable table.
1. Why Hole Condition Matters More Than Surface Appearance
A scarred, discoloured table top looks bad and welds fine. A table with damaged holes looks acceptable and welds badly, because every fixture in the shop indexes into those holes. A raised burr at a hole edge, a thin film of spatter inside a bore, or a slightly ovalised hole all change where the clamp sits — and the clamp is where accuracy comes from.
Burrs at the hole edge prevent bushings and pins from seating fully, which lifts the fixture off the datum.
Spatter inside a bore reduces effective diameter and forces pins in at an angle.
Ovalised or bell-mouthed holes allow the clamp to rock, and rocking multiplies into error at the end of an arm.
Debris packed into unused holes hardens with heat and becomes very difficult to remove later.
2. Daily Routine: Spatter Control
The cheapest spatter is the spatter that never bonds. Prevention happens before the arc is struck:
Apply anti-spatter spray or paste to the working area and to fixture faces before each job; reapply after cleaning.
Use copper backing bars and sacrificial tabs so the arc and the bead are not against clamps or the table surface.
Position clamps so that the weld zone is not directly above a bushing or pin.
At the end of the shift, brush the surface, blow out or plug the holes, and wipe fixture faces.
Never grind or arc-gouge on the working surface; use a sacrificial plate.
3. Removing Spatter Without Damaging the Surface
When spatter does bond, the removal method matters. Aggressive removal damages the very geometry you are trying to protect.
| Method | Suitable for | Risk |
|---|---|---|
| Anti-spatter film + nylon brush | Light daily spatter | None; this is the correct first approach |
| Plastic / brass scraper | Bonded spatter on the flat surface | Low, if used flat and without prying |
| Dedicated hole reamer / cleaning tool | Spatter inside bores | Low; restores bore without cutting new geometry |
| Fine abrasive pad | Discolouration and light film | Moderate; can round hole edges if used carelessly |
| Angle grinder / chisel / hammer | Nothing | High; destroys flatness and hole edges |
4. Burr Removal and Dressing
Burrs are raised metal displaced by impact. Left in place, they lift fixtures; removed clumsily, they take the surrounding surface with them. The correct approach is to dress them flush rather than to grind them away:
Identify burrs by running a finger or a pin around the hole edge — do it before a clamp misbehaves, not after.
Dress with a fine stone or a dedicated deburring tool, keeping the tool flat to the surface.
Clean the bore afterwards; dressing pushes debris into the hole.
Re-check that a pin and a bushing seat fully in the dressed hole.
5. Inspection Intervals
| Interval | Task | What it protects |
|---|---|---|
| End of shift | Brush surface, clear and plug holes, wipe fixtures | Prevents spatter build-up and hole damage |
| Weekly | Check that pins and bushings seat fully; check clamp locking force | Catches wear before it affects parts |
| Monthly | Inspect hole edges for burrs; check table level and leg loading | Keeps the surface and the geometry true |
| Quarterly | Inspect fixture inventory; replace worn pins, bushings, jaws | Prevents silent accuracy loss |
| Annually | Verify surface flatness against the installation baseline | Provides a record and catches slow drift |
| After any incident | Full check after impact, overload or a weld-through event | Stops one accident becoming a permanent error |
6. The Habits That Destroy Tables
Each of these is common in shops that have never been told otherwise, and each one costs far more in accuracy than the few seconds it saves.
7. Consumables Worth Keeping in Stock
Anti-spatter spray or paste, and applicators.
Hole plugs in the system size, plus a cleaning brush and reamer set.
Spare locating pins and bushings — the fastest-wearing parts in the system.
Spare clamp jaws and cam elements for the clamps you use most.
A fine deburring stone kept beside the table, so dressing happens when the burr is found.
FAQ: Welding Table Care
How often should spatter be removed?
Every shift. Spatter that sits through a heating cycle bonds far more strongly and takes far more effort to remove, and the effort is what damages the surface.
Can a damaged hole be repaired?
Light damage can often be dressed and the bore restored with the correct tool. Significant ovalisation or bell-mouthing usually cannot be corrected in place, which is why prevention and plugging matter so much.
Does cleaning really affect weld quality?
Indirectly, yes. A fixture that does not seat correctly holds the work in the wrong position, and the resulting rework costs far more than the cleaning time. Clean holes are an accuracy control, not a housekeeping task.
A short daily routine is the most reliable way to keep a modular table welding accurately for years. Workpiece type, duty cycle and shop conditions are enough for the engineering team to recommend a maintenance schedule and consumables list.
-
Welding Table Maintenance: Spatter Protection, Hole Care and Accuracy Retention
-
Welding Positioner and Modular Welding Table: Combining Rotation With Hole-System Fixturing
-
Magnesium-Aluminum Straightedge vs Cast Iron Straightedge: Choosing the Right Straight Reference
-
Granite Surface Plate vs Cast Iron Surface Plate: Which Measuring Base Should You Specify?
-
Cast Iron Surface Plate Grades and Accuracy: How to Specify What You Actually Need
-
Machine Tool Leveling Pads and Adjustment Shims: A Practical Installation Guide
Botou Bozhong Precision Machine Tool Co., Ltd.
Copyright © 2025-2026 https://www.bozhong-weldingtable.com. All Rights Reserved Botou Bozhong Precision Machine Tool Co., Ltd.Copyright