






- Navigation -
 Current Location:
NEWS DETAILS
NEWS INFORMATION
Welding Table Support Fixtures and Quick-Locking Clamps: How to Build a Clamping Kit That Holds
AUTHOR:Bozhong Tool DATE:2026-10-30 11:32:41 HITS:160
A hole-system table is only as productive as the hardware that locks into it. In most shops the table itself is bought once, while the welding table support fixtures and quick-locking clamps are bought, worn out, replaced and gradually standardised over years. Getting that kit right on the first pass is what turns a modular platform from an expensive flat surface into a fixture system that pays back every week.

This guide covers the clamp families you actually need, how to think about holding force in relation to weld distortion rather than to workpiece weight, where fixtures wear and why that matters, and how to assemble a kit that covers the majority of fabrication jobs without becoming a drawer full of rarely used parts.
1. The Fixture Families and What Each One Is For
Modular fixturing is a small number of simple functions repeated in different shapes. Once you see the functions, the catalogue stops being confusing.
| Fixture family | Function | When it is the right choice |
|---|---|---|
| Locating stops and stop rails | Define the datum position of the workpiece | Every job; this is the accuracy-setting element |
| Quick-locking clamps | Apply and release holding force fast | Repeat work where setup time dominates |
| Screw / eccentric clamps | Higher, adjustable holding force | Heavy sections and distortion-prone welds |
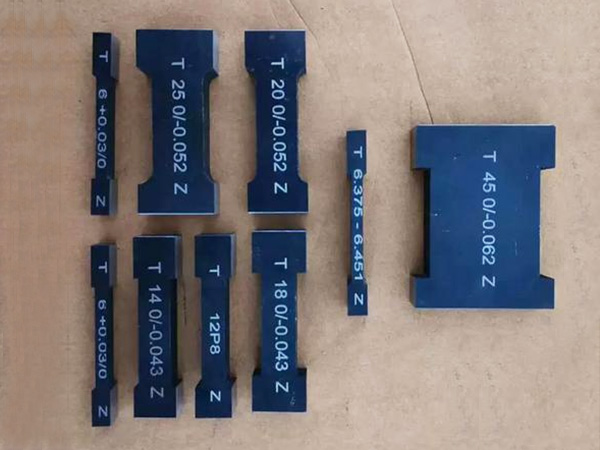
| Angle brackets and right-angle plates | Establish square corners without measuring | Frames, boxes, enclosures |
| Support and riser blocks | Lift work clear of the surface | Underside welds, irregular shapes |
| Locating pins and bushings | Precise repeatable position | Any job that runs more than once |
2. Holding Force: Size It Against Distortion, Not Against Weight
The most common sizing error is to calculate the force needed to stop the part falling off the table. That is a gravity problem, and gravity is the easy part. The real load is the force the weld applies as it shrinks, plus the leverage generated whenever the clamp contacts the work away from the weld line.
Shrinkage force: a cooling weld pulls the joint closed with considerable force. Restraint must be placed where the movement will occur, not simply where there is room for a clamp.
Leverage: a clamp acting 300 mm from the weld has to resist the moment generated at that distance. Short, direct restraint is always more effective than a big clamp in a convenient spot.
Reaction: every clamp pushes back into the table. The hole and bushing take that load, which is why hole condition is a clamping issue as much as a maintenance issue.
Sequence: tack, check, then fully restrain before the final weld. Clamping a cold assembly and welding it in one pass invites movement.
3. Quick-Locking Clamps: Why They Change Setup Economics
A quick-locking clamp replaces the thread winding of a conventional clamp with a cam, wedge or spring mechanism that engages in a fraction of a turn. On a job that is set up ten times a month, that difference is the whole business case for modular tooling.
Three things determine whether a quick clamp is a good purchase:
Repeatability of the locked position. A cam mechanism that locks at a slightly different point each time introduces variation that no amount of care will remove.
Resistance to spatter and heat. Clamps live next to the weld. Exposed threads and sliding surfaces need protection, or they will seize within weeks.
Ergonomics. If the release mechanism needs two hands or a tool, the time saving disappears. Welders should be able to operate it with gloves on.
4. Where Fixtures Wear, and Why It Matters
Fixtures fail quietly. Nothing breaks; the clamp simply stops holding the position it held last month. The wear points are predictable and worth inspecting:
Bushing and pin contact surfaces — the interface that sets position. Wear here directly becomes dimensional error.
Cam and wedge faces — wear changes the point at which the clamp locks, and therefore the force it applies.
Stop faces — repeated impact from loaded workpieces rounds the edge that defines the datum.
Threaded elements — spatter and heat damage threads long before they strip visibly.
Treat pins, bushings and clamp jaws as consumables and hold spares. A fixture kit with no spares is a fixture kit that will eventually hold work in the wrong place while nobody notices.
5. A Starter Kit That Covers Most Work
| Element | Quantity per station | Reasoning |
|---|---|---|
| Quick-locking clamps, 2 sizes | 6–8 | Covers the majority of holding duties |
| Locating stops / stop rails | 10–12 | Datums are needed on every job; buy in multiples |
| Angle brackets | 4 | Square corners without layout time |
| Support / riser blocks | 6–8 | Access to underside welds and odd geometry |
| Locating pins and bushings | 25–30 | Wear items; stock spares |
| Hole plugs and cleaning brush | 1 set | Protects the table, which protects every fixture |
Buy this, use it for a month, and then buy more of whatever ran out. That is a far cheaper route to a well-stocked cell than guessing at a large kit up front.
6. Standardising the Kit Across the Shop
Standardise on one hole system so clamps move between stations freely.
Use the same clamp sizes wherever possible so spares and training stay simple.
Photograph and label recurring setups; the photo is faster to follow than a drawing.
Keep a shadow board or rack so missing items are obvious at a glance.
Review the kit quarterly against the jobs that actually ran.
FAQ: Welding Table Fixtures and Quick-Locking Clamps
How many clamps do I need for one station?
Enough to restrain your largest recurring assembly at all the points where distortion will occur, plus two spares. For most job shops that is six to eight quick clamps plus a full set of stops.
Why does a clamp lose holding force over time?
Usually cam or wedge face wear, or contamination. Spatter on a sliding surface and worn locking faces both reduce the force delivered for the same input. Clean and inspect; replace worn elements rather than tightening harder.
Can I mix fixture brands on one table?
Only within the same hole system and with verified tolerances. Mixing systems through reducing bushings adds clearance at the point where accuracy is set, which defeats the purpose of modular tooling.
Standardising the right fixture kit is the fastest way to shorten setup time. Send workpiece drawings, batch quantities and tolerance targets to the engineering team for a recommended clamp and stop package.
-
Welding Table Support Fixtures and Quick-Locking Clamps: How to Build a Clamping Kit That Holds
-
Welding Table Maintenance: Spatter Protection, Hole Care and Accuracy Retention
-
Welding Positioner and Modular Welding Table: Combining Rotation With Hole-System Fixturing
-
Magnesium-Aluminum Straightedge vs Cast Iron Straightedge: Choosing the Right Straight Reference
-
Granite Surface Plate vs Cast Iron Surface Plate: Which Measuring Base Should You Specify?
-
Cast Iron Surface Plate Grades and Accuracy: How to Specify What You Actually Need
Botou Bozhong Precision Machine Tool Co., Ltd.
Copyright © 2025-2026 https://www.bozhong-weldingtable.com. All Rights Reserved Botou Bozhong Precision Machine Tool Co., Ltd.Copyright